So during my
Linux From Scratch tangent, I installed several Gnu/Linux distributions to see which one would suit my purposes out of the box. I found that two distros were the easiest to work with. Although for one my definition of easy, and a new user to Gnu/Linux's would differ. ;-)
I settled on two distros to use. The first one I tried that is perfect for someone who doesn't want to have to configure too much to get the build environment going was OpenSuse. I remember trying this distribution 15 years ago or so and loved it. Yum is a great package manager, and really easy to use and customize your system with. In fact, package management is one of the things that set the two distros apart. The other distribution I settled on and will be using for my tutorials is Arch Linux. I love how hands-on it is, and I was able to customize my environment with ease.
I learned some tricks to install Arch and since it's more hands-on than OpenSuse I figured I would share some tricks with you. Big ups go to
Abhishek Prakash for his
post at the excellent
It's FOSS blog, and Mohd Sohail and his
post on
linuxandubuntu.com. I am going to put together my two takeaways from their walkthroughs in this one. Abhishek's suggestion of optimizing the mirrors using reflector, and Mohd Sohail's excellent description of using cfdisk, or cgdisk to set up the partitions. These tools are way easier to use than fdisk or parted.
*** edit ***
I forgot to mention the first source you should check. The Arch Linux Installation Wiki. The two additions to the instructions that I have added, aren't mentioned in the installation instructions. The partitioning information is just guidelines so you can customize it the way you like, and the reflector usage is just to optimize your mirror choice for quicker package downloads. No matter what though always check with Arch's
installation guide first to make sure my instructions regarding the other steps are still relevant.
So first things first, we need to obtain the latest iso of Arch. We simply need to go to the
Downloads section of Arch's website. There are a plethora of choices to download. I chose a direct download from a mirror that is consistently fast for me. I downloaded my Gentoo stuff from the same mirror when I was installing Gentoo. Once you have downloaded the iso file you can verify its correctness by entering the following:
$ gpg --keyserver-options auto-key-retrieve --verify archlinux-version-x86_64.iso.sig
There is a windows port of gpg, but I'm not going to get into how to use this on Windows. Google is your friend. ;-)
Now you need to make your installation media bootable. We do that with the command dd.
The if= argument takes the location of the iso file you downloaded. So for example:
if=/home/nerdtek/Downloads/archlinux.iso
The of= argument takes the drive, not the partition. So for the first drive, it would be of=/dev/sda as opposed to of=/dev/sda1
The bs= argument refers to the bitrate of this operation. So the example is suggesting 4 MB/s.
# dd bs=4M if=path/to/archlinux.iso of=/dev/sdx status=progress oflag=sync
So next you need to insert your media and reboot your system. Some systems may require you to access the boot menu via f12 or similar button during boot post. Shortly you should see the installation media boot screen:
You will get a plain terminal and a prompt:
The first thing we need to do is partition the drive.
So we either need to use cfdisk for a system that does not UEFI enabled, or cgdisk for a system with UEFI enabled.
I will first show the non-UEFI system. Click here for the UEFI enabled system.
First, we need to see what the system sees the drive we want to install Arch on is called.
So we run fdisk -l
So in this instance, we can see our drive is /dev/sda. More than likely this will be the case in your case as well. So now we will need to figure out what partitions we would like to make.
- /dev/sda1 This will be the /boot partition that will hold our kernel images and grub.cfg. We will make this 200 MB in size.
- /dev/sda2 This will be the swap partition and we will make this of memory up to a max of 2 GB.
- /dev/sda3 This will be our / root partition
Some people like to separate the / root partition and make a separate /home partition. This makes moving your /home folders to a new system easy. The drive I am installing on is smaller than 30 GB so I am not going to bother.
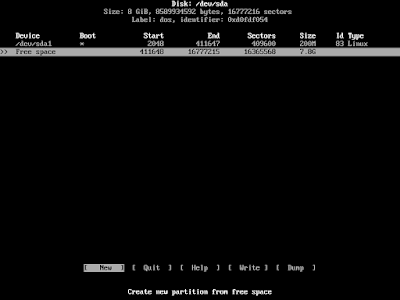
So we start up cfdisk with cfdisk /dev/sda remember to change the sda if your drive has a different designation.
Choose dos as the label type. 'gpt' is for UEFI enabled systems. On the next screen select New.
Next, change the default size by typing 200M.
Select Primary on the next screen.
Selected bootable in the next screen, and you will notice that there is an asterisk under the boot column for /dev/sda1.
Move down to the Free space and select new.
We will make the next partition the swap partition so that it will be half of RAM up to a maximum of 2 GB. So in my case, I set my swap to 2 GB.
Next,
we need to change the partition type to 82 Linux swap / Solaris.
Next select write from the main menu and type yes
Now quit. We need to create our file system, and then we will be ready to move on to the next step.
If you don't need the UEFI enabled system instructions then skip to the Creating filesystems section.
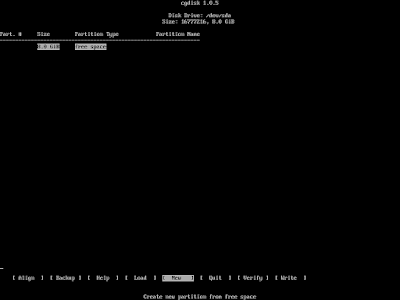
For UEFI enabled systems we run cgdisk instead of cfdisk.
# cgdisk /dev/sda (or whatever drive you are installing to)
A warning pops up, it is safe to ignore this. Just continue to the next screen.
So the difference when creating these partitions is the bios partition has a type of ef02. Unlike with cfdisk, it will prompt you for the type when creating a new partition.
So the procedure is:
- Choose +1M as the second sector selector, the type will be ef02, and the name will be 'bios'
- Choose +200M as the second sector selector, the type will be 8300 (default), and the name will be 'boot'
- Choose +{half of ram up to 2G max} with the appropriate M or G after the amount, the type will be 8200 for Linux swap, and the name will be 'swap'
- Choose the defaults for sectors, the type will be 8300 (default), and the name will be 'root'
Select write and then type 'yes', then quit
Creating Filesystems
We need to create an ext2 filesystem on /dev/sda1, a swap filesystem on /dev/sda2, and an ext4 filesystem on /dev/sda3. (remember to substitute the appropriate drive designation if you are not installing to /dev/sda)
The drives will be slightly different for the UEFI enabled system. /dev/sda2 for /boot /dev/sda3 for swap and /dev/sda4 for / root.
We will come back to the drive. Now we need to optimize our set up of pacman the package system that will install the operating system and any tools we might need along the way.
The first command we will run will synchronize the repository information that is stored, which will be as of the date on the install iso. Usually the first of the current month.
Type pacman -Syy to accomplish this.
Next, we need to install reflector. Type pacman -S reflector
Next, we run reflector with
reflector -c "CA" -f 12 -l 10 -n 12 --save /etc/pacman.d/mirrorlist substituting your country code for the "CA".
Now we are ready to continue with our newly formatted drive.
The first thing we need to do is mount the root partition and the boot partition.
Type: mount -v -t ext4 /dev/sda3 /mnt
Next, we need to create the boot directory on our newly mounted partition.
Now, mount the boot partition at /dev/sda1
mount -v -t ext2 /dev/sda1 /mnt/boot
Now, it is time to bootstrap our system onto the drive. This is accomplished with the command pacstrap
# pacstrap /mnt base linux linux-firmware vim nano links dhcpcd
This tells the bootstrapping program to load the base system, plus firmware and some needed utilities. 'vim' and 'nano' are text editors (you only need to install one), links is a terminal-based web browser, and dhcpcd is so we have internet once we reboot. This command will take quite some time to complete. After it completes, it's time to generate the fstab and chroot into our new system. Setup the fstab file, locale, timezone, and networking information.
So the first command we type is: # genfstab -U /mnt >> /mnt/etc/fstab
Next, we need to chroot into /mnt:
Timezone
We need to set up a symlink to the appropriate timezone info at /etc/localtime. To figure out what your Region and City specifiers are you can run # tzselect so in my case, my Region is America and my City is Toronto.
# ln -sf /usr/share/zoneinfo/Region/City /etc/localtime
Next, we need to synchronize the clock by creating the /etc/adjtime file.
Run # hwclock --systohc
Localization
Edit the /etc/locale.gen file and remove the # for the locales you wish to enable plus en_US.UTF-8
Next run # locale-gen to create the locales, and create the /etc/locale.conf file with
# echo 'LANG=en_CA.UTF-8' > /etc/locale.conf
Network Configuration
Create the hostname file
# echo {your desired hostname} > /etc/hostname
Edit the /etc/hosts file
127.0.01   localhost
::1        localhost
127.0.1.1  {your desired hostname}{fqdn} {your desired hostname}
The fully qualified domain name doesn't have to be registered, it's just that some software will not work correctly if this is not set. I use nerdtek.example.com myself.
So my last line would be
127.0.1.1 nerdtek.example.com nerdtek
Root Password
Grub
Install grub:
pacman -S grub
Install the Xorg server, selecting the default choices.
Install Gnome, once again selecting the default choices.
Once the system is shut down remove the install cd/USB key.
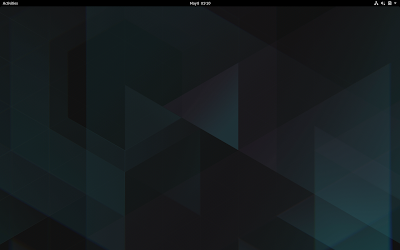
Startup the system again booting into your newly installed operating system.
Create a new user.
Turn on the Gnu Display Manager service.
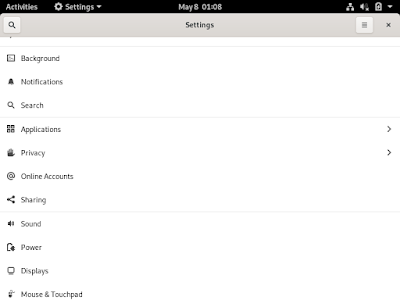
Once into the Gnome desktop go to settings/displays, and update your screen resolution.


 Step 1. Add honey and water to stock pot and bring to a boil.
 Step 2 - with 15 minutes to go add the orange peel wrapped in cheese cloth to the mixture.
 Step 3 - zest orange peel and add to a few layers of cheese cloth and tie off the cloth.
 Step 4 - at the last minute of boil add the orange peel to the pot.
 Step 5 - Transfer the mixture to the fermenter (in this case an ice cream tub)
 Step 6 - Once the mixture is luke warm sprinkle the yeast into the mixture.
 Step 7 - After 24 hours push the cheese cloths down into the mixture to get the yeast off of them and take a specific gravity reading. In the case of this batch mine was 1.054. Make sure to note this reading some where as you will need it later.